
 |
 |
 |
 |
 |
 |
 |
 |
Originally Published December 2006 in
INTRODUCTIONWelcome to the first installment of VW-DIY! With this regular feature we're hoping to provide good practical guidance to VW enthusiasts who would like a more active role keeping their VW on the road. It saves cash, is fun and is the only way to ensure that the job's been done right. Our aged VW's have the distinction of being some of the most straight-forward vehicles to work with and a lot can be achieved with just a few inexpensive tools and a little know-how. We hope you find VW-DIY helpful in getting some of this VW know-how! Our intention is for the feature to move from the basic tasks upwards with the first few installments addressing general maintenance. Preventing a problem from happening is the best way to fix it and so it follows that regularly servicing your vehicle is going to be the most important thing you need to know. It requires only a few tools and can save you a load of trouble. It's also a great way to get to know your VW and give you an indication about problems that may be developing. OVERVIEWThis month we're going to cover the all-important oil change. Motor oil lubricates all the metal parts in the engine allowing rapid movement, minimizing both wear and the generation of heat. In air-cooled vehicles, oil also provides a crucial role in cooling the engine. Every VW owner should be concerned about the amount and state of the oil in their vehicle! As a rule of thumb your oil needs changing every 3000 miles or every three months if you only do short trips. If your vehicle is new to you, then change it straight away. Keep an eye on your oil level. Despite what we tell people when we park on their drives, most of our VW's tend to leak oil, so it's a good habit to check it at least weekly. (I tend to check more frequently so that I don't need to when it's belting down with rain). To change the oil in your VW you need to remove the oil sump plate to allow the oil to drain and get to the oil strainer & oil strainer gaskets (seals) located behind the plate. The strainer needs to be replaced, cleaned and then refitted along with new gaskets. Once the oil sump plate is reinstalled with the oil strainer and new gaskets are in place, new oil is poured into the engine via the oil filler. | ||||
TOOLSYou're going to need a few tools for this job. Firstly, you need a service manual for your particular model. If you don't already have one - get one as it's the bible for your VW. Next is a 1/4" drive ratchet and a 1Omm socket. The 1/4" size is the smallest ratchet available and is great for getting into tight places. Whilst you only need a 10mm socket for this job, it is usually better value for money to get a whole set. They are available for under a tenner nowadays and perhaps not the best quality, it would be hard to imagine not getting a tenner's use out of it. If you can, get one that comes with a solid case so you don't end up with missing sockets. |
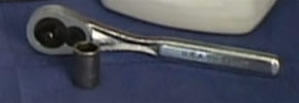
1/4" Ratchet with 10mm Socket |
|||
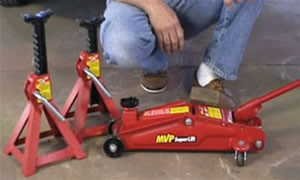
Trolley Jack and Axle Stands |
You need access to the oil sump drain plate which is directly under the engine. On a standard VW bus you should have enough room to wiggle yourself under and get all the access you need, but if your particular vehicle is lower to the ground, you may need more space. If you do need extra room, use a trolley jack and a pair of axle stands. Two ton jacks and stands are the most common and are more than enough for our vehicles. You can find jack and stand sets for around £20. Next you need a container big enough for the old oil to drain into. You can obtain oil drain pans with removable covers for around a tenner which seal up so you can cleanly transport it to a safe disposal station. You may also want to purchase a box of latex gloves to keep your hands clean (they're cheap, clean and great for dirty jobs). |
|||
PARTSObviously you are going to need some new oil! You can find out how much motor oil is needed for your particular engine from your service manual. Now there are plenty more opinions about which oil to use than there are brands available so we're going to avoid that debate. However, regardless of the brand, motor oil is graded to indicate what operating conditions it is best suited for. For me in the North of England I use 30 weight oil. Your vehicle's needs may be different for your location. Whichever brand of oil you choose, it is widely accepted that you should continue to use that type. That said, if the choice is to drive your vehicle low on oil or use a different brand (or even grade) of oil - get that oil in there! | 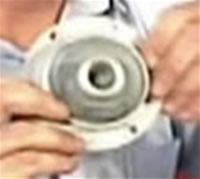
Oil Screen |
|||
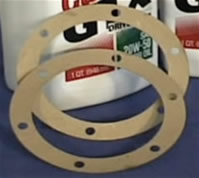
Oil Screen Gaskets |
You will also need new oil screen gaskets. They typically come in a kit for under 50p containing the two gaskets you need for each oil change and copper washers used for the nuts on the oil sump plate. If the vehicle is new to you, or it's been a while since it's been changed, you may want to buy a new oil screen for about £3. It's actually more of a big strainer and you'll find a lot of VWs don't even have them! They're cheap, last a long time, and can give you an idea of what's floating around in your engine, so make sure you have one in yours. Lastly, have a little paraffin, an old brush, and a rag to hand to clean parts with. |
|||
PROCEDUREStep I - Jack Up VehicleOk, we've got our tools and parts so lets get started! You should have already determined if there is enough room under the engine to fit both you and your tools. If there isn't, then it's time to jack up the vehicle. Ensure that the vehicle is on a level surface and chock one of the front wheels so the vehicle won't move when you lift up the rear wheels. Slide your jack under the vehicle and position it so that the lifter makes contact between where the engine and the transmission meet. Put a small block of wood on the lifter to cushion the engine where it meets the jack. With the vehicle raised up to a height that allows you to comfortably work under, it it's time to use your jack stands to support the vehicle in that position. Under no circumstance get under a vehicle supported only by a jack! Hydraulic jacks can and have failed and you don't want to be under a vehicle when a jack gives way! Lower the jack such that the vehicle rests on the stands. Grab the rear of the vehicle and give it a little shake to ensure that the stands remain flat and firm. Step II - Drain OilTime to get dirty so get those gloves on! Position the drain pan under the engine so that it sits under the sump plate. Lying on your back with your socket set in easy reach, position yourself under the vehicle so that you can easily reach the sump plate. While all our VWs have sump covers held on by six 10mm nuts only some of them have a drain plug in the centre. These drain plugs are a handy way to drain the oil before removing the cover, thus reducing the amount of spillage. If you don't have a sump plate with a plug but fancy one, they can be purchased for less then a tenner. If you do have one of these plugs use an appropriate socket or spanner (21mm or 19mm) to remove the drain plug and let the oil drain out before removing the sump plate. If you don't have this plug, it's no big deal as the oil will just dump out when you remove the sump plate. To remove the plate take your 1/4" ratchet drive with the 10mm socket and, starting with the nut farthest away from you, remove them. Keep the nuts together so you can find them again as you'll need them when refitting the plate. Remove each of the nuts in order until you get to the one closest to you. Leaving the last nut tight stops the oil gushing out all over you whilst undoing the other five nuts. With the other nuts removed, loosen this last nut which will fully release the plate and let the oil drain out quickly. Let the oil drip into your collector. When the majority of the oil has drained, completely remove this last nut which releases the oil sump plate. You can now remove the oil strainer and the two gaskets (circular cardboard seals) which reside behind the sump cover. | ||||
Step III - Clean Strainer / Renew GasketsIt's time to give the sump plate and, if you're not replacing it, oil strainer a good clean. Get your paraffin / solvent and brush out along with a cleaning bucket or tray. Pour the paraffin over the strainer and plate and brush them both to get them nice and clean. Give them a final wipe with a rag. The sump plate and oil strainer need to be reattached to the engine. Fit the oil strainer back on the studs making sure it is sandwiched between the new gaskets. Once you have worked these tight against the sump, work the sump plate over the studs with the flange side facing down. With this in place, finger tighten each of the nuts into position using new washers (if they were provided with your oil change kit). Use your 10mm socket to tighten the nuts until they are firmly in place. Do the same for the drain plug if your sump plate has one. |
||||
|
||||
Step IV - Fill With OilWith the sump plate in position, fill the engine with the amount of oil appropriate for your VW. If you wish to check how much oil is in the engine whilst adding it, ensure you give the fresh oil a few minutes to settle into the sump before checking with a dipstick. Keep in mind this is clean, clear oil so the dipstick will be slightly harder to read than when full of used black oil! With the appropriate amount of oil added and double checked via the dipstick, the job is done! Let the vehicle down off the jack stands, remove the chocks from the wheels, and reward yourself with your beverage of choice! TROUBLESHOOTINGOil drains as slowly as molassesThis is common on cold engines especially on cold days. To speed up the engine draining stage, start the engine and let it warm up a bit before draining the oil. Don't let it get too hot or you'll burn yourself on the oil! A few minutes warm up should get the oil warm enough for it to run out nicely. Oil sump stud comes offWhen removing the nuts from the oil sump plate, sometimes a stud will come off with the nut. This is quite common and easily sorted. Wait until you are ready to reinstall the sump plate and simply screw the stud back into the empty hole which it came out of. Tighten the nut on this stud as normal. Oil Sump stud severs when tightening nutsDon't panic! When this occurs you can usually get a hold of the sheared stud still in the case using a pair of vice grips, which you can use to unscrew the stud from the case. You may need to remove the sump plate, oil strainer, and oil strainer gaskets to reach the severed stud. Once removed, you can replace the stud with a new one. | ||||
A VW enthusiast for several years, Scott runs VW-DIY, the UK distributor for the "Bug Me Video" DIY DVD series. All photo and video samples used in this article are from that series. For more information on this or any products from VW-DIY please visit them online at www.VW-DIY.com.